shell-logger
![]()
![]()
![]()
![]()


![]()


![]()
The shell-logger Python package allows you to interact with the shell,
while logging various metadata, statistics, and trace information. Any time
you’re tempted to write your own wrapper around things like
subprocess.Popen or subprocess.run(), consider using
ShellLogger.log() instead. If you’re familiar with the Unix script
command, this is similar in principle, but with substantially more
functionality. If you’re familiar with Python’s logging module, the
motivation is similar, but this intends to capture what’s happening in the
shell rather than in Python itself.
The following talk from the US-RSE Virtual Workshop 2021 illustrates the module’s functionality.
Where to Get shell-logger
The source repository for this module can be found on GitHub. See the project’s README for details on how to clone, install, and otherwise interact with the project.
Using shell-logger
At a high-level, ShellLogger.log() allows you to execute commands, given
as strings, in the shell. When a command is executed, ShellLogger
will also collect the following information:
The command run
A description of the command, or why it was run
stdoutandstderrEnvironment variables
Working directory
Hostname
User and group
Umask
Return code
Ulimit
Command start/stop time and duration
It can also optionally collect:
Resource usage (CPU, memory, disk)
Trace information (
strace,ltrace)
These data are collected in a “log book”. When you call
ShellLogger.finalize(), the contents of the log book are written to a
HTML log file.
Example 1: The Basics
For this initial example, let’s first consider a simple “Hello World” script written in bash:
example/hello_world.sh1#!/usr/bin/env bash
2
3# Greet everyone to make them feel welcome.
4echo 'Hello World'
5
6# Tell everyone who you are, but from a different directory.
7cd ..
8whoami
The equivalent Python script written with shell-logger, demonstrating its
basic functionality where it’s logging commands only to the HTML log file, is
the following:
example/hello_world_html.py 1from pathlib import Path
2
3from shell_logger import ShellLogger
4
5sl = ShellLogger(
6 "Hello World HTML",
7 log_dir=(Path.cwd() / f"log_{Path(__file__).stem}"),
8)
9sl.print(
10 "This example demonstrates logging information solely to the HTML log "
11 "file."
12)
13sl.log("Greet everyone to make them feel welcome.", "echo 'Hello World'")
14sl.log(
15 "Tell everyone who you are, but from a different directory.",
16 "whoami",
17 cwd=Path.cwd().parent,
18)
19sl.finalize()
20print(f"Open {sl.html_file} to view the log.")
Running the script yields
This example demonstrates logging information solely to the HTML log file.
Open <path-to-example-dir>/log_hello_world_html/<timestamp>_<unique-str>/Hello_ShellLogger.html to view the log.
When you open that file, you’ll see something like
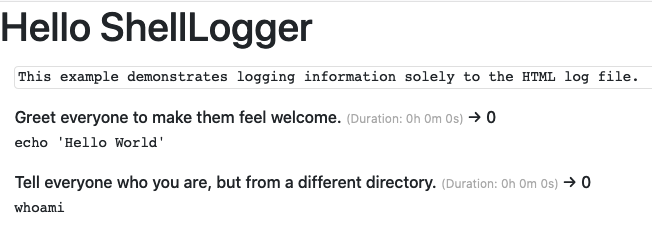
When you first open the log file, most of the content will be collapsed. You can click on any of the commands to expand it.

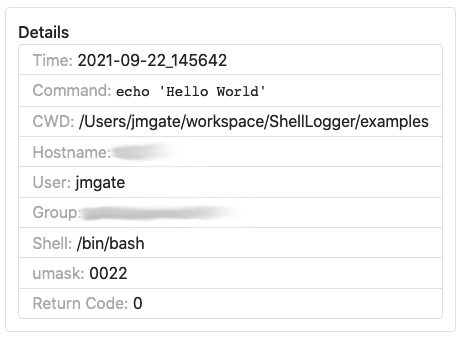
Here you can see some details, along with stdout and stderr. Clicking
on Details yields even more information:
Similarly, clicking Diagnostics gives you even more information:
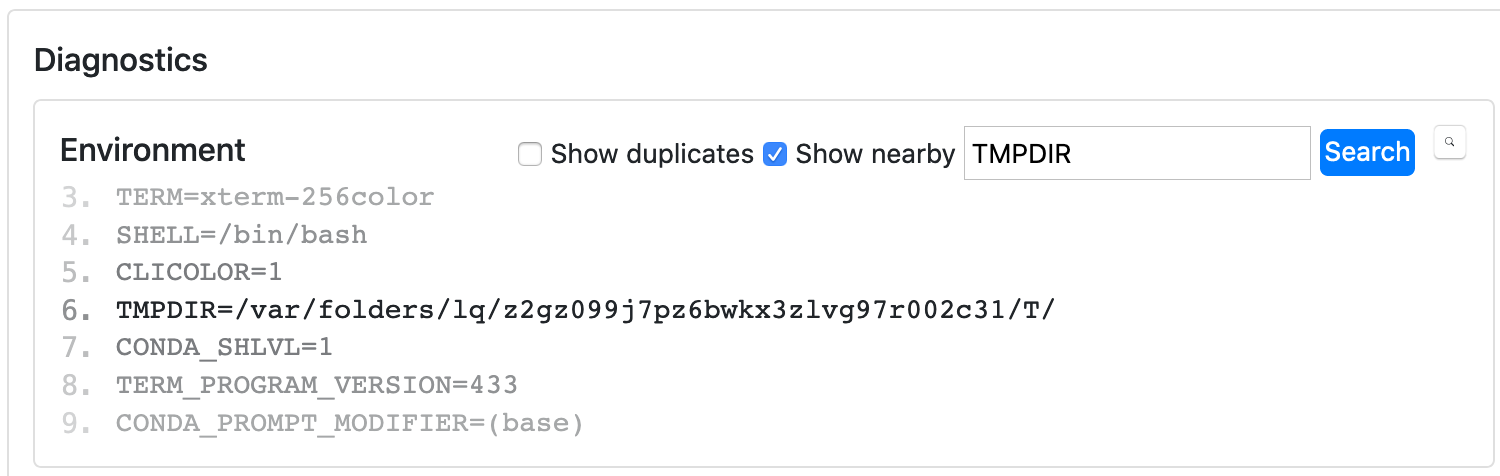
Note that some of the cards allow you to search the output via a regular expression, which can be really helpful when debugging.
If you look inside the log directory that’s created by ShellLogger,
you’ll see the following:
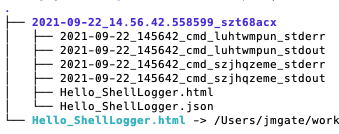
The timestamped log directory is created with each run of the script. Any future runs of the script will create additional timestamped log directories as siblings. This is to ensure you never accidentally overwrite a prior log.
Within the timestamped log directory, you’ll notice a number of files that contain the
stdoutandstderrstreams from the commands that were executed.Then there’s the HTML log file itself, which you can open in a browser.
Alongside it is a JSON log file that’s used to construct the HTML log file, mapping the commands to their output streams.
The last item is a symbolic link to the latest HTML log file. If the script is run multiple times, this link is updated to always point to the latest log.
Example 2: Simultaneous Logging to the Console
This next example demonstrates logging commands both to the HTML log file and the console. The primary differences between this and Example 1 are the highlighted lines below.
example/hello_world_html_and_console.py 1from pathlib import Path
2
3from shell_logger import ShellLogger
4
5sl = ShellLogger(
6 "Hello World HTML and Console",
7 log_dir=(Path.cwd() / f"log_{Path(__file__).stem}"),
8)
9sl.print(
10 "This example demonstrates logging information both to the HTML log file "
11 "and to the console simultaneously."
12)
13sl.log(
14 "Greet everyone to make them feel welcome.",
15 "echo 'Hello World'",
16 live_stdout=True,
17 live_stderr=True,
18)
19sl.log(
20 "Tell everyone who you are, but from a different directory.",
21 "whoami",
22 cwd=Path.cwd().parent,
23 live_stdout=True,
24 live_stderr=True,
25)
26sl.finalize()
27print(f"Open {sl.html_file} to view the log.")
Example 3: Collecting Statistics
In this example, we demonstrate how easy it is to capture various statistics while running your commands in the shell. The primary differences between this and Example 1 are the highlighted lines below.
example/hello_world_html_with_stats.py 1from pathlib import Path
2
3from shell_logger import ShellLogger
4
5sl = ShellLogger(
6 "Hello World HTML with Stats",
7 log_dir=(Path.cwd() / f"log_{Path(__file__).stem}"),
8)
9sl.print(
10 "This example demonstrates logging information solely to the HTML log "
11 "file, while collecting CPU, memory, and disk statistics at the same time."
12)
13measure = ["cpu", "memory", "disk"]
14sl.log(
15 "Greet everyone to make them feel welcome.",
16 "echo 'Hello World'",
17 measure=measure,
18)
19sl.log(
20 "Tell everyone who you are, but from a different directory.",
21 "whoami",
22 cwd=Path.cwd().parent,
23 measure=measure,
24)
25sl.finalize()
26print(f"Open {sl.html_file} to view the log.")
Example 4: Building a Code
In this final example, we use shell-logger to do some “real
work”—cloning, configuring, and building flex, a fast lexical analyzer generator.
Before we do that, let’s take a look at what the bash script would look like:
example/build_flex.sh 1#!/usr/bin/env bash
2
3# Clone the Flex repository.
4git clone \
5 --depth 1 \
6 --branch flex-2.5.39 \
7 https://github.com/westes/flex.git \
8 flex-2.5.39
9
10# Run `autogen`.
11cd flex-2.5.39 || exit
12./autogen.sh
13
14# Configure flex.
15./configure --prefix="$(dirname "$(pwd)")/flex"
16
17# Build `libcompat.la`.
18cd lib || exit
19make libcompat.la
20
21# Build & install flex.
22cd ..
23make install-exec
The equivalent Python script using shell-logger is the following:
example/build_flex.py 1from pathlib import Path
2
3from shell_logger import ShellLogger
4
5sl = ShellLogger(
6 "Build Flex",
7 log_dir=(Path.cwd() / f"log_{Path(__file__).stem}"),
8)
9sl.print(
10 "This example demonstrates cloning, configuring, and building the Flex "
11 "tool."
12)
13FLEX_VERSION = "flex-2.5.39"
14sl.log(
15 "Clone the Flex repository.",
16 f"git clone --depth 1 --branch {FLEX_VERSION} "
17 f"https://github.com/westes/flex.git {FLEX_VERSION}",
18 live_stdout=True,
19 live_stderr=True,
20)
21sl.log(
22 "Run `autogen`.",
23 "./autogen.sh",
24 cwd=Path.cwd() / FLEX_VERSION,
25 live_stdout=True,
26 live_stderr=True,
27)
28measure = ["cpu", "memory", "disk"]
29sl.log(
30 "Configure flex.",
31 "./configure --prefix=$(dirname $(pwd))/flex",
32 cwd=Path.cwd() / FLEX_VERSION,
33 live_stdout=True,
34 live_stderr=True,
35 measure=measure,
36)
37sl.log(
38 "Build `libcompat.la`.",
39 "make libcompat.la",
40 cwd=Path.cwd() / f"{FLEX_VERSION}/lib",
41 live_stdout=True,
42 live_stderr=True,
43 measure=measure,
44)
45sl.log(
46 "Build & install flex.",
47 "make install-exec",
48 cwd=Path.cwd() / FLEX_VERSION,
49 live_stdout=True,
50 live_stderr=True,
51 measure=measure,
52)
53sl.finalize()
54print(f"Open {sl.html_file} to view the log.")
More Details
For more detailed usage information, see the ShellLogger class reference.